How to Trim Cat Nails Safely: A Complete Home Guide
Trimming a cat’s nails at home is one of those tasks that sounds straightforward but turns into a struggle the first time a cat decides otherwise. A scratch that draws blood, a nail clipped too short, a cat that sprints under the bed the moment clippers appear — these are common experiences, not signs that you’re doing it wrong.
This guide covers the complete process: nail anatomy, tool selection, desensitization, step-by-step trimming for front and back paws, age-specific adjustments, and what to do when something goes wrong. The goal is to make cat nail trimming a calm, routine part of your cat’s care rather than a source of stress for either of you.
Why Trimming Your Cat’s Nails Matters
What Happens When Nails Grow Too Long: Ingrown Nails and Mobility Issues
Cat nails grow in a continuous curve. Without regular trimming, the tip of the nail eventually circles back toward the paw pad and begins to grow into the soft tissue — a condition called an ingrown nail. This is painful and creates an entry point for bacterial infection. The paw may become swollen, tender, and the cat may start limping or avoiding weight on that paw.
Before reaching the ingrown stage, overgrown nails cause more subtle problems. Nails that are too long catch on carpet loops, upholstery, and blankets. A cat that panics while snagged can tear a nail partially from the nail bed — an injury that requires veterinary care to treat properly. Long nails also force a slight change in the angle at which the paw meets the floor, creating cumulative stress on the toe joints and wrist with every step.
In older cats, the nails often thicken and become more brittle as well as growing longer. The risk of the nail curling into the pad is highest in senior cats, particularly in the dewclaw (the small claw partway up the inner leg that doesn’t contact the ground). Dewclaws have no natural wear mechanism at all and require consistent monitoring.
Indoor vs. Outdoor Cats: Natural Wear Differences
Outdoor cats use hard surfaces — pavement, gravel, bark, rocky ground — during their daily movement. This abrasion naturally wears the nail tip down, reducing how often active outdoor cats need trimming. They also scratch on trees, fence posts, and other rough surfaces more consistently than most indoor cats do on scratching posts.
Indoor cats live on carpet, wood, and smooth tile. These surfaces provide minimal nail abrasion. A scratching post helps — it removes the outer sheath of the nail and conditions the nail itself — but it does not replicate the constant mechanical wear of outdoor activity. Indoor cats need more frequent trimming than outdoor cats as a baseline.
Why Declawing Is Not the Answer
Declawing (onychectomy) is not a nail trim. The procedure surgically removes the last bone of each toe — the equivalent of amputating a human finger at the last knuckle. Recovery is painful, the altered toe anatomy changes the cat’s gait, and the loss of the claw removes the cat’s primary means of defense, creating lasting behavioral anxiety in many cats.
The American Veterinary Medical Association (AVMA) and the ASPCA both oppose declawing except in rare cases where it is medically necessary for the cat’s own health. New York became the first US state to ban elective declawing in 2019; Maryland followed in 2022. Over 20 countries have banned the procedure entirely.
If scratching behavior is the underlying concern — furniture damage, injury to people — the solution is nail trimming, appropriate scratch surfaces, and environmental design, not declawing. Nail caps (soft vinyl covers glued to each claw) are also a widely used option for cats whose owners cannot manage regular trimming.
Cat Nail Anatomy: Finding the Quick
Understanding the Quick (Blood Vessel and Nerve)
The visible nail is made of keratin — the same protein as human fingernails. Running through the center of each nail is a soft tissue core containing a blood vessel and a nerve. This is called the quick.
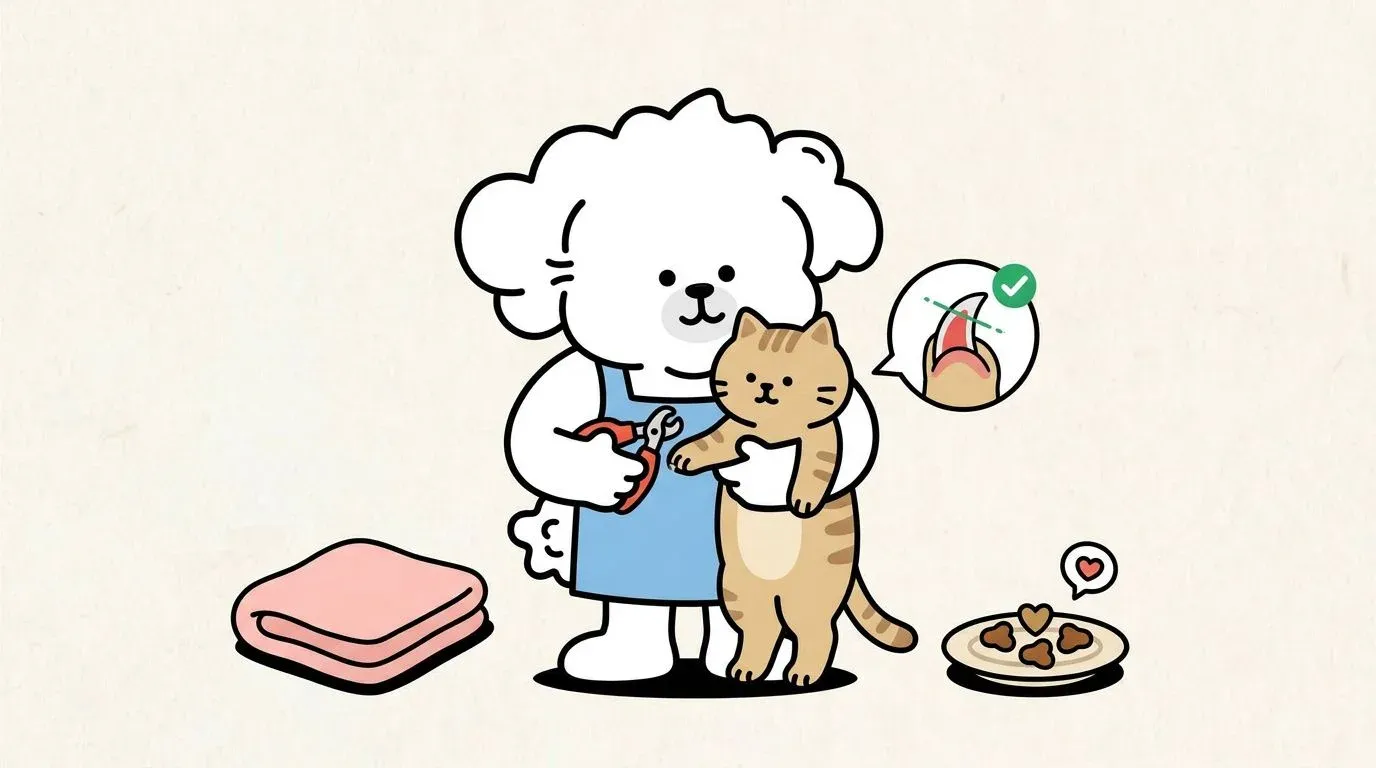
The quick is sensitive. If cut, it bleeds immediately and causes pain — brief and not dangerous, but sufficient to make the cat distrust future nail sessions if it happens repeatedly. The goal of nail trimming is always to remove the curved tip of the nail while leaving several millimeters of clearance between the cut and the quick.
The quick does not extend to the very tip of the nail. The safest cut is always at the clear, curved tip — the part that hooks. In a properly timed trim (not overdue), this region contains no blood supply at all.
Light Nails vs. Dark Nails: How to Spot the Quick
Light or white nails are straightforward. Hold the paw up to a lamp or window and you can see the quick as a pinkish line running through the center of the nail. The safe cut zone is the translucent area beyond where the pink ends — aim to cut 2 mm past the visible quick.
Dark or black nails are genuinely harder to work with. The pigment in the nail blocks the visual contrast that makes the quick visible in light nails. Two techniques help:
LED transillumination: Hold a small LED flashlight — or the flashlight on your phone — flush against the underside of the nail and shine it upward toward the tip. In many dark nails, this backlighting will reveal a faint pinkish or darker core where the quick is. It does not work on every cat, but it is worth attempting before trimming.
Incremental trimming: If transillumination doesn’t work, trim 1 mm at a time from the tip. After each small cut, look at the cross-section of the cut nail. The very tip will appear chalky white or yellowish. As you move closer to the quick, the cross-section will show a faint grayish or pinkish dot appearing in the center — that dot is the outer edge of the quick. Stop cutting the moment you see it.
For dark-nailed cats, trimming more frequently (every 2 weeks rather than 3-4) and taking very small amounts each session is much safer than infrequent sessions where more nail growth has accumulated.
Choosing the Right Nail Clipper
The tool you use matters more than most guides acknowledge. Using the wrong clipper — or a dull blade — crushes the nail rather than cutting it cleanly, which is uncomfortable for the cat and may contribute to nail splitting.
| Clipper Type | Best For | Pros | Cons |
|---|---|---|---|
| Scissor-style (cat nail scissors) | Beginners, small to medium cats | Easy to control, forgiving angle | Requires hand strength over time |
| Guillotine-style | Experienced owners | Fast, precise for consistent use | Blade alignment must be exact; blades dull faster |
| Electric grinder | Very sensitive cats, extremely thick nails | No snapping sound; smooth finish | Requires extended desensitization; heat risk if used too long per nail |
Scissor-Style Clippers: Best for Beginners
Scissor-style clippers have two curved blades that close like scissors around the nail. The curved blade profile is designed for the rounded cross-section of a cat nail. For a first-time owner, the scissor style offers the most control: the angle of approach is adjustable, you can see exactly where the blade will land before closing it, and the motion is intuitive.
Look for blades made from stainless steel — they stay sharper longer and are easier to sanitize. Clippers with a safety guard (a small notch that limits how far the blade closes) can help prevent over-cutting while learning.
Guillotine-Style Clippers: For Experienced Owners
Guillotine-style clippers have a fixed ring through which the nail is inserted; a blade slides across to cut. They can make a very fast, clean cut but require the nail to be positioned correctly inside the ring before the cut — if the nail is angled incorrectly, the blade compresses the nail rather than cutting it cleanly. For owners comfortable with the tool, they work well. For beginners, the positioning step adds uncertainty.
Replace the blade in guillotine clippers every 4-6 months, or sooner if you notice the cut requires more pressure than it used to. A dull blade is the most common cause of nail splitting.
Electric Grinders: For Sensitive Cats
Electric grinders (rotary nail files) sand the nail down gradually rather than cutting it. Because there is no snapping sound and no sudden pressure, they can be more tolerable for cats that have had negative experiences with clipping. However, the buzzing noise and vibration require their own desensitization process — grinders are not a shortcut for anxious cats, just a different tool with different requirements.
Limit grinding to 2-3 seconds per nail to prevent heat buildup. If you smell anything burning, stop immediately. Keep the cat’s fur away from the spinning head — it can catch and pull.
Step-by-Step Nail Trimming Guide
STEP 1: Desensitization — Getting Your Cat Used to Paw Handling (1-2 Weeks)
Rushing directly to clipping on the first attempt is the most common mistake. A cat that associates paw handling with sudden restraint and an unfamiliar sharp object will be harder to manage every session after. Investing 1-2 weeks in desensitization before the first trim makes every subsequent session easier.
Week 1 — Paw touching: During a calm moment — not right after the cat has been active, and not when they are trying to sleep — briefly touch one paw, apply gentle pressure for 2 seconds, and immediately offer a high-value treat (something the cat gets only during this exercise). Repeat 3-4 times per session, 1-2 sessions per day. The cat should remain relaxed throughout. If the cat pulls away, reduce contact duration further until there is no reaction, then build back up.
By the end of week 1, the goal is for the cat to tolerate you gently pressing the paw pad to extend a nail without pulling away.
Week 2 — Tool introduction: Bring the clippers into the same space as the cat without attempting to use them. Let the cat sniff the clippers. Simulate the sound by clicking them near (but not on) the cat while offering treats. Then, with the cat calm, hold a paw, extend a nail, and touch the clipper blade to the nail without cutting. Reward immediately. This step separates the sensation of the clipper from the act of cutting, so neither is novel when you proceed to the actual trim.
STEP 2: Introduce the Tool — Sounds and Vibrations
Before using the tool on nails, let your cat hear and feel it at low stakes. Click scissor-style clippers near the cat’s paw while giving treats. If using a grinder, turn it on briefly in the cat’s presence at a distance, offer a treat, then gradually move it closer over multiple sessions.
The specific goal here is that the sound of the clipper becomes a predictor of a treat rather than a predictor of something startling. This conditioning is the foundation of calm grooming sessions long-term.
STEP 3: Trimming Front Paws — One Nail at a Time
The front paws contain 5 claws each: four on the main toes and one dewclaw partway up the inner leg. The dewclaw is particularly important to check — it curves outward and does not contact the ground, so it has no natural wear.
Positioning: Place the cat on your lap facing away from you, or have a second person hold the cat gently against their chest. Avoid restraining the cat firmly — resistance increases with pressure. A calm, loose hold works better than a firm grip for most cats.
Extending the nail: Gently press the top and bottom of the paw pad between your thumb and index finger. This extends the nail forward for a clear view.
Making the cut: Identify the quick (pink area in light nails; use transillumination or incremental technique for dark nails). Position the clipper blade at a slight angle — not straight across — at the hooked tip, leaving at least 2 mm of clearance beyond the quick. Close the blade in one smooth, confident motion. Hesitating mid-cut increases the chance of a crushing, rather than clean, cut.
One nail per session is enough to start. There is no requirement to complete all 18 claws in a single session. Ending on a positive note — calm cat, successful cut, immediate treat — is more important than getting through every nail. Over days, the sessions will naturally extend.
STEP 4: Trimming Back Paws — Positioning and Restraint
Rear claws are smaller, less curved, and generally easier to trim than front claws. Most cats are also less protective of their back paws than their front paws, which makes positioning slightly more flexible.
With the cat on your lap, gently hold the back leg at the ankle (hock), pressing the paw pad to extend each nail. Alternatively, lay the cat on their side in a calm, supported position — some cats find lateral positioning less stressful than being held upright because they feel more supported.
Rear claws do not have a dewclaw in most cats (though some cats, called polydactyls, have extra toes and claws in various locations — check all toes at each session). Trim the same way as front claws: identify the quick, cut the curved tip, reward immediately.
Age-Specific Nail Care
Kittens (Under 6 Months): Soft Nails, Short Sessions
Kitten nails are softer and thinner than adult cat nails. They also grow faster — most kittens need trimming every 1-2 weeks. The tradeoff is that soft nails are much less likely to cause injury during handling, and kittens that are desensitized to paw handling early are far easier to manage as adults. This period is the single best window to establish nail trimming as a normal, unremarkable part of life.
Keep sessions very brief — even one or two nails followed by play and a treat is a productive session. The priority is positive association, not comprehensive coverage.
Kitten nails also retract less completely than adult cat nails, so the quick is proportionally more exposed. Be conservative with how much you trim.
Adult Cats (1-7 Years): Standard Routine
Adult cats with consistent nail trimming histories are generally the easiest to work with. A routine of every 2-4 weeks works for most indoor adult cats, with the exact frequency depending on the individual cat’s nail growth rate and scratching behavior.
| Age | Nail Growth Rate | Recommended Frequency |
|---|---|---|
| Kitten (< 6 months) | Fast | Every 1-2 weeks |
| Adult (1-7 years) | Moderate | Every 2-4 weeks |
| Senior (8+ years) | Slower, but thicker | Every 2-3 weeks |
For adult cats that have not had nails trimmed regularly before, expect a longer desensitization period — often 2-4 weeks rather than 1-2. Patience and ending every session before the cat becomes stressed will determine how quickly progress accumulates.
Senior Cats (8+): Thickened Nails and Joint Considerations
Senior cat nails are thicker, more brittle, and grow more slowly than adult cat nails. However, the slower growth rate does not reduce the need for regular trimming — it actually increases the risk of ingrown nails if trimming is skipped, because the nail continues curving even as growth slows.
Arthritis is common in cats over 8 years old — the American Association of Feline Practitioners estimates that over 90% of cats over 12 years show radiographic evidence of arthritis. This has direct implications for nail trimming: a cat with sore joints in the wrist or shoulder may find the standard trimming positions uncomfortable. If your senior cat seems restless or resistant when their paw is extended, try a lateral (lying on side) position, and be especially gentle with any extension or flexion of the leg. For cats already managing joint pain, the cat arthritis symptoms and home care guide covers how to recognize pain during everyday handling and what accommodations help during grooming.
Senior cats also may be less flexible in approaching their own nails for scratching, so scratching posts may become less effective at natural nail maintenance. Thicker nails may require sharper or heavier-duty clippers — if you feel significant resistance during the cut, your clipper blades may be dull and ready to replace.
What to Do If You Cut the Quick
Cutting the quick is genuinely common, especially when learning. It looks alarming because cats’ nails bleed freely from the quick — but the injury itself is minor and stops on its own without treatment in most cases. The bigger concern is the cat’s reaction, which can range from a brief flinch to a determined attempt to leave the room. How you handle the next few minutes determines how easily the cat will accept future trimming sessions.
Step 1: Apply Direct Pressure (10 Seconds)
Hold a clean cloth, gauze pad, or tissue firmly against the bleeding nail. Maintain steady pressure for 10 full seconds without releasing to check — checking interrupts the clotting process. After 10 seconds, release and check. If bleeding has stopped, no further intervention is needed.
Keep the cat calm and in place during this step. Your own reaction matters: speaking calmly and not expressing alarm will keep the cat’s stress response lower than if you react with urgency.
Step 2: Use Styptic Powder or Cornstarch
Styptic powder is the most effective first-aid tool for quick injuries. It contains an astringent (usually ferric subsulfate) that constricts the blood vessels and significantly speeds clotting. Press a pinch of styptic powder directly onto the bleeding nail tip and hold it there with light pressure for 30 seconds.
If styptic powder is not available, cornstarch works as a slower alternative — pack a small amount against the tip of the nail. Flour also works in a pinch. Do not use baking powder, which contains cream of tartar and can irritate the tissue.
First aid kit recommendation for nail trimming sessions:
- Styptic powder (keep this consistently stocked)
- Clean gauze pads
- Small forceps or cotton swabs for applying powder precisely
- Treats (for immediate recovery of positive association)
Step 3: When to See the Vet
Most quick injuries are self-limiting and resolve in minutes with direct pressure or styptic powder. See a veterinarian if:
- Bleeding has not stopped after 10-15 minutes of consistent direct pressure
- The nail itself is partially or fully torn away from the nail bed (not just a quick cut)
- The paw becomes swollen, warm, or the cat is walking with visible pain in the following days
- The cat is licking the paw obsessively after the incident
A partially torn nail is a different injury from a cut quick — it may require sedation and removal of the loose nail fragment to heal properly. Do not try to remove a hanging nail yourself.
After any quick injury, end the trimming session for the day regardless of how many nails remain. Give the cat a treat and let them go. Return to trimming in a day or two, starting with a nail far from the one that bled and keeping the session brief and positive.
Common Mistakes That Make Cat Nail Trimming Harder
Trimming when the cat is already stressed. A cat that was just chased by a child, exposed to a new environment, or just woke up startled is not in a state for nail trimming. Wait for genuine calm — a cat that is resting, slow-blinking, or just finished grooming themselves.
Holding the cat too tightly. The instinct when a cat starts to pull away is to increase grip. This is counter-productive. A tighter grip escalates the cat’s distress, and most cats can and will escape anyway — just more stressed than if the grip had been lighter. If a cat actively resists, put them down, end the session, and try again later.
Trying to finish all 18 nails in one session when starting out. One nail per session is fine and sustainable. Consistency over weeks matters more than completeness in any single session.
Using dull clippers. A dull blade crushes the nail instead of cutting it cleanly. The sensation is noticeably different to the cat — a crush compress against the nail bed, versus a quick clean cut. Replace blades at the first sign of resistance or nail splitting.
Skipping the reward. The treat must come immediately after each nail — within 2-3 seconds — for the cat to associate the reward with the trimming rather than with something else that happened afterward. Delayed rewards don’t build the positive association that makes future sessions easier.
If nail trimming is a major source of ongoing stress, it is worth addressing the broader anxiety around handling and grooming. The cat stress relief and home care guide covers pheromone tools, enrichment strategies, and desensitization approaches that support calmer handling across all types of cat care.
Some cats also develop nail-biting or excessive claw chewing as a stress-related or compulsive behavior — if your cat gnaws at their own nails frequently, this may be a sign of underlying anxiety worth evaluating. The cat overgrooming and compulsive behavior guide covers when claw-directed behaviors cross into compulsive territory and what to do about it.
FAQ
How often should I trim my cat's nails?
How do I find the quick on a dark cat nail?
My cat refuses to let me touch their paws. What should I do?
Do I need to trim my cat's back claws?
What is the best type of nail clipper for cats?
Is declawing a humane alternative to regular nail trimming?
Related Articles
Cat Spring Shedding: 5 Vet-Backed Steps to Control the Fur
Cat spring shedding explained: why it happens, how to tell normal from abnormal, and 5 vet-backed steps to manage fur and prevent hairballs.
Dog Hydrotherapy: 4 Ways Water Therapy Rebuilds Joint Strength
Discover how dog hydrotherapy uses buoyancy and resistance to rebuild joint strength. Covers underwater treadmill vs pool therapy, who benefits, session expectations, and safe at-home options.
How to Massage Your Dog's Joints: A Step-by-Step Home Guide for Every Condition
Dog joint massage guide for arthritis, hip dysplasia, and post-surgery rehab. Step-by-step protocols for every joint with breed-specific pressure tips.
Dog Joint Surgery Recovery: A Vet-Based Week-by-Week Rehab Guide
Dog joint surgery recovery guide covering TPLO, patellar luxation, hip surgery, and disc surgery. Week-by-week rehab timeline and home care protocols.
Red Light Therapy for Dogs at Home: A Science-Based Safety Guide
Learn how red light and near-infrared therapy works for dogs, what the research actually shows, and how to use it safely at home — with dosimetry guidance.
Luxating Patella Exercises for Dogs: A Grade-by-Grade Home Rehab Guide
Grade-specific exercises for dogs with luxating patella — from foundation moves for Grade I-II to aquatic alternatives. Includes reps, sets, and a safety checklist.
How Near-Infrared Therapy Works for Dogs
Discover how near-infrared (NIR) therapy helps relieve joint pain and inflammation in dogs through scientific mechanisms.
Senior Dog Joint Care Guide
A comprehensive guide to maintaining joint health and managing pain in aging dogs.
How to Safely Restart Your Dog's Activity After Winter: A Spring Joint Care Guide
Spring dog joint care guide: assess winter deconditioning, follow a 4-week progressive activity plan, and spot warning signs before they become injuries.
Are Cat Hairballs Really Normal? The Truth About Prevention and Risk
Cat hairball prevention explained: what's a safe frequency, when vomiting signals danger, and an integrated 3-pillar approach — grooming, diet, and environment.
7 Essential Dog Paw Care Tips Every Owner Should Know
Your complete dog paw care guide: moisturizing cracked pads, trimming nails, preventing hot pavement burns, winter de-icer hazards, first aid for injuries, and when to call the vet.
3 Health Warning Signs Hidden in Your Dog's Tear Stains
Dog tear stains signal more than cosmetic issues. Learn to identify root causes—nasolacrimal obstruction, allergies, diet, infection—and apply cause-specific management strategies.
Puppy First Bath: A Stress-Free Step-by-Step Guide
When to give a puppy their first bath, how to bathe them safely, choose the right shampoo, dry properly, and handle bath fear.
Cat Skin Allergies: Causes, Symptoms, Treatment, and Home Care Guide
Cat skin allergies cause scratching, hair loss, and rashes. This evidence-based guide covers all 4 types, vet-approved home remedies, medications, and an 8-week elimination diet protocol.
Why Is My Dog Throwing Up? Causes by Vomit Color and When to See the Vet
Learn the most common dog vomiting causes by vomit color, breed risk factors, emergency warning signs, and a step-by-step home care protocol from hours 0–24.